Tinc VPN on Turris Omnia
This tutorial will walk you through on how to install Tinc on your Turris Omnia.


With the Turris Omnia being the hot new router, I thought I'd give it a try. That did mean though that I had to get Tinc up and running on it - one of the main reasons why I didn't go for the Ubiquiti Dream Machine Pro.
This tutorial will walk you through on how to install Tinc on your Turris Omnia.
Installing Tinc
We'll start off in LuCI and head to System > Software. If you've just set up your Turris Omnia, you'll need to update the package lists by hitting Update lists... as otherwise you won't see any packages.
Once you've got the up to date package lists, you can enter tinc in the Filter section and hit enter. This should bring up the following results.
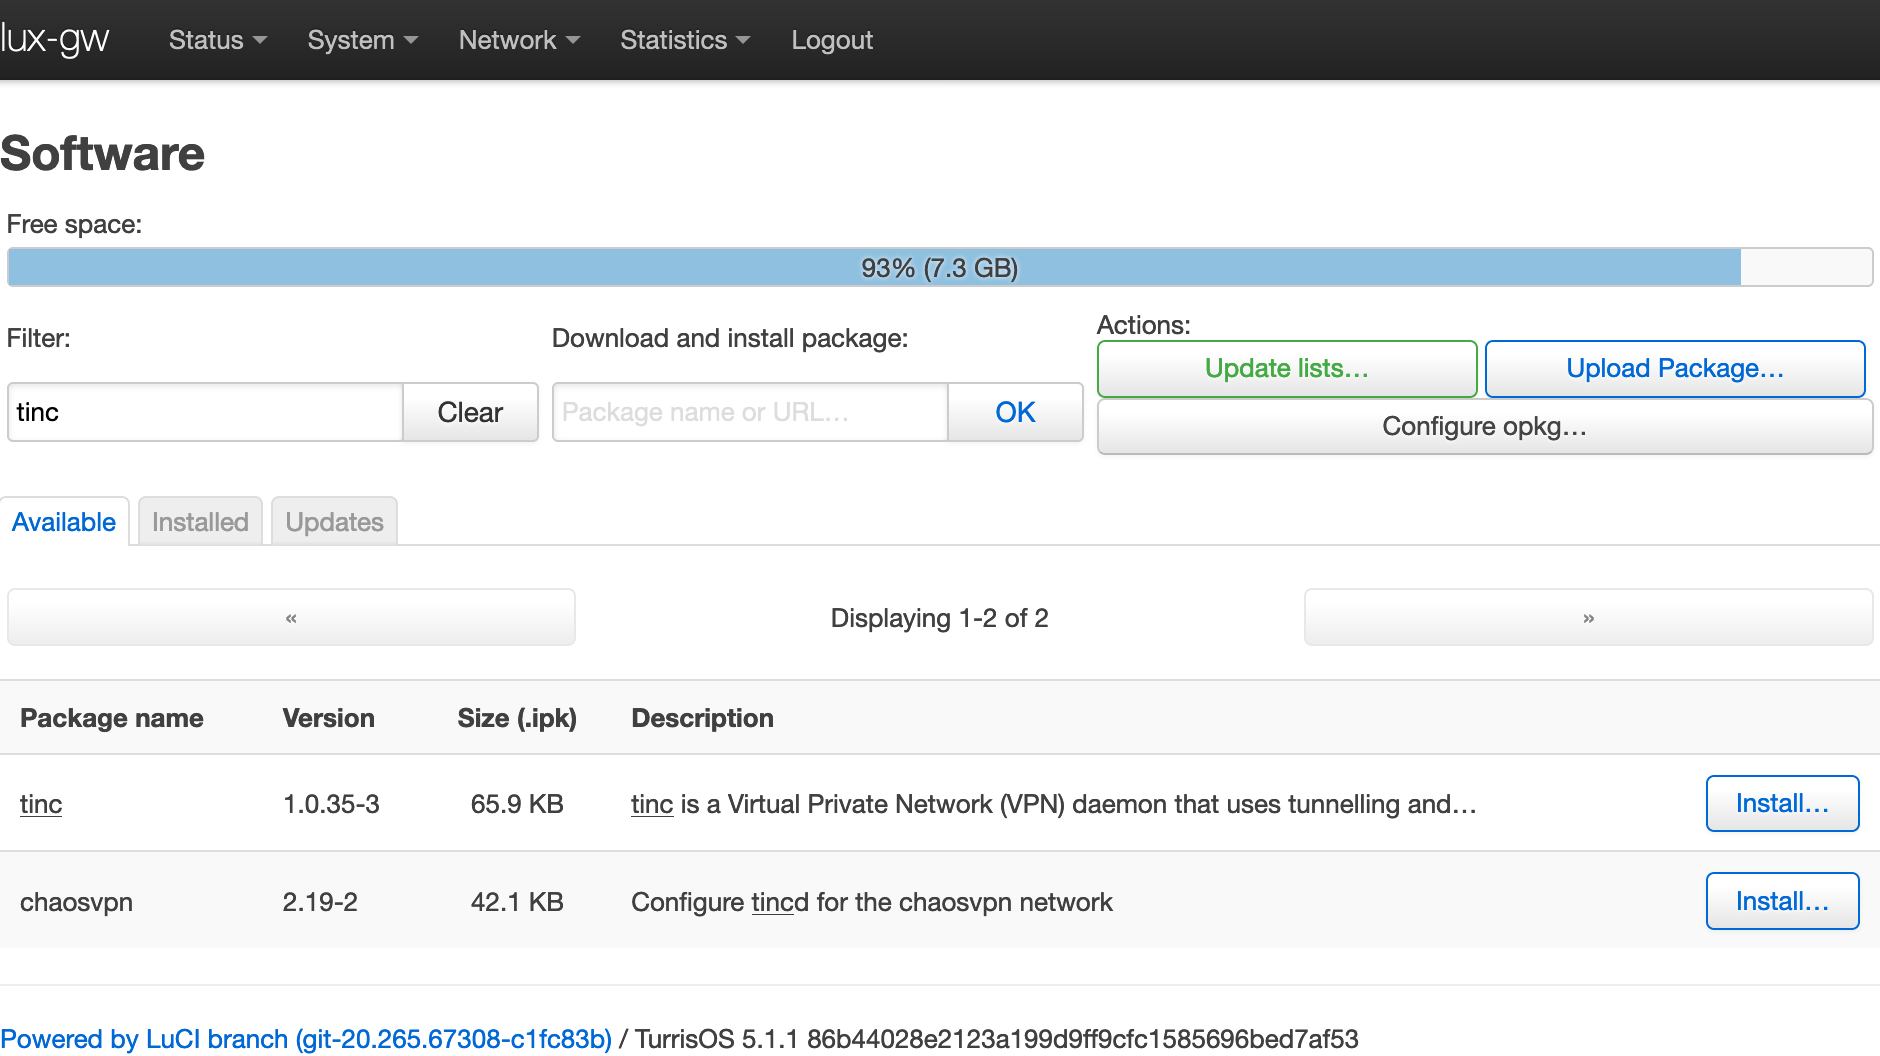
Just select Install ... and confirm. Tinc has now been installed on your Turris Omnia.
Generate Keys
Now that you have tinc installed, you'll have to generate the keys for this tinc node. All the following commands will happen over SSH, so log in to your Turris. In my case, my network is called examplenet, as such, I'll create a folder for it's data: mkdir /etc/tinc/examplenet/.
Please note the network name doesn't support special characters such as -.
Next I'll generate the keys: tincd --net=examplenet -K. If you didn't create the folder, the key generation will fail.
Edit configuration file
Tinc normally makes use of a series of files and directories under /etc/tinc/ for it's configuration. On OpenWrt much of configuration has been moved into the uci system into the file located at /etc/config/tinc. The OpenWrt Tinc init script will use the contents of the tinc uci config along with files in the /etc/tinc directories to generate a full Tinc configuration located under /tmp/tinc.
We'll use the /etc/config/tinc file for our basic configuration needs.
You'll notice 2 main sections, one for tinc-net and the other one for tinc-host.
tinc-net
Let's start with replacing the NETNAME with our network name, in my case examplenet. This will need to be done in 3 locations under tinc-net.
Next we'll enable it: option enabled 1 and configure some of the other options. My enabled options under tinc-net are - for node lux:
config tinc-net examplenet
        option enabled 1

        list ConnectTo bcn
        option Interface examplenet
        option Mode router
        option Name lux
        option PrivateKeyFile /etc/tinc/examplenet/rsa_key.priv
tinc-host
Under tinc-host, I configured the host itself, lux and also a second one called bcn to which it'll connect to.
Again, here's a summary of my configurations that aren't commented:
config tinc-host lux
        option enabled 1

        option net examplenet

        list Address lux.example.net
        option Compression 0
        option Subnet 10.10.0.0/24

config tinc-host bcn
        option enabled 1

        option net examplenet

        list Address bcn.example.net
        option Compression 0
        option Subnet 10.0.0.0/24
These configurations will be used to generate the Tinc host files normally located at /etc/tinc/NETNAME/hosts/NODENAME.
UCI doesn't seem to have a place to hold the public keys that go in a host config file so you will still be expected to have files with public keys at /etc/tinc/NETNAME/hosts/NODENAME but the other values from the UCI section will be combined when a host file is generated under /tmp/tinc/NETNAME/hosts/NODENAME.
Adding public keys
As such, we'll add the public keys manually to the tinc configuration directory. Let's create the hosts directory: mkdir /etc/tinc/examplenet/hosts and then let's create the host files for lux and bcn in that folder, just containing the keys.
For lux, we generated the key, so it's as easy as: cat /etc/tinc/examplenet/rsa_key.pub > /etc/tinc/examplenet/hosts/lux
Just use your favourite text editor to add the public key to a bcn file in the same folder.
Routing
Now that we have our network and node configuration ready, let's add some finishing touches, such as the routing.
tinc-up
In order for the interface to be brought up correctly, we'll add the following tinc-up file in our /etc/tinc/examplenet/ folder:
#!/bin/sh
ubus -t 15 wait_for network.interface.$INTERFACE
ip=`uci get network.lan.ipaddr`
ifconfig $INTERFACE $ip
tinc-down
Similar for tinc-down
#!/bin/sh
ifconfig $INTERFACE down
subnet-up
Let's add the routes. In my case, I am routing all of 10.0.0.0/8 as I have networks across this range in my Tinc scope.
#!/bin/sh
route add -net 10.0.0.0/8 dev $INTERFACE
subnet-down
And let's remove this route when we're done with it.
#!/bin/sh
route del -net 10.0.0.0/8 dev $INTERFACE
Executable permissions
We'll need to set permissions to allow these files to be executed.
chmod +x /etc/tinc/examplenet/tinc-up
chmod +x /etc/tinc/examplenet/tinc-down
chmod +x /etc/tinc/examplenet/subnet-up
chmod +x /etc/tinc/examplenet/subnet-down
Create Network in LuCI
Next we'll create the network in LuCI for easier management. Head over to Network > Interfaces and click Add new interface.... I called mine examplenet
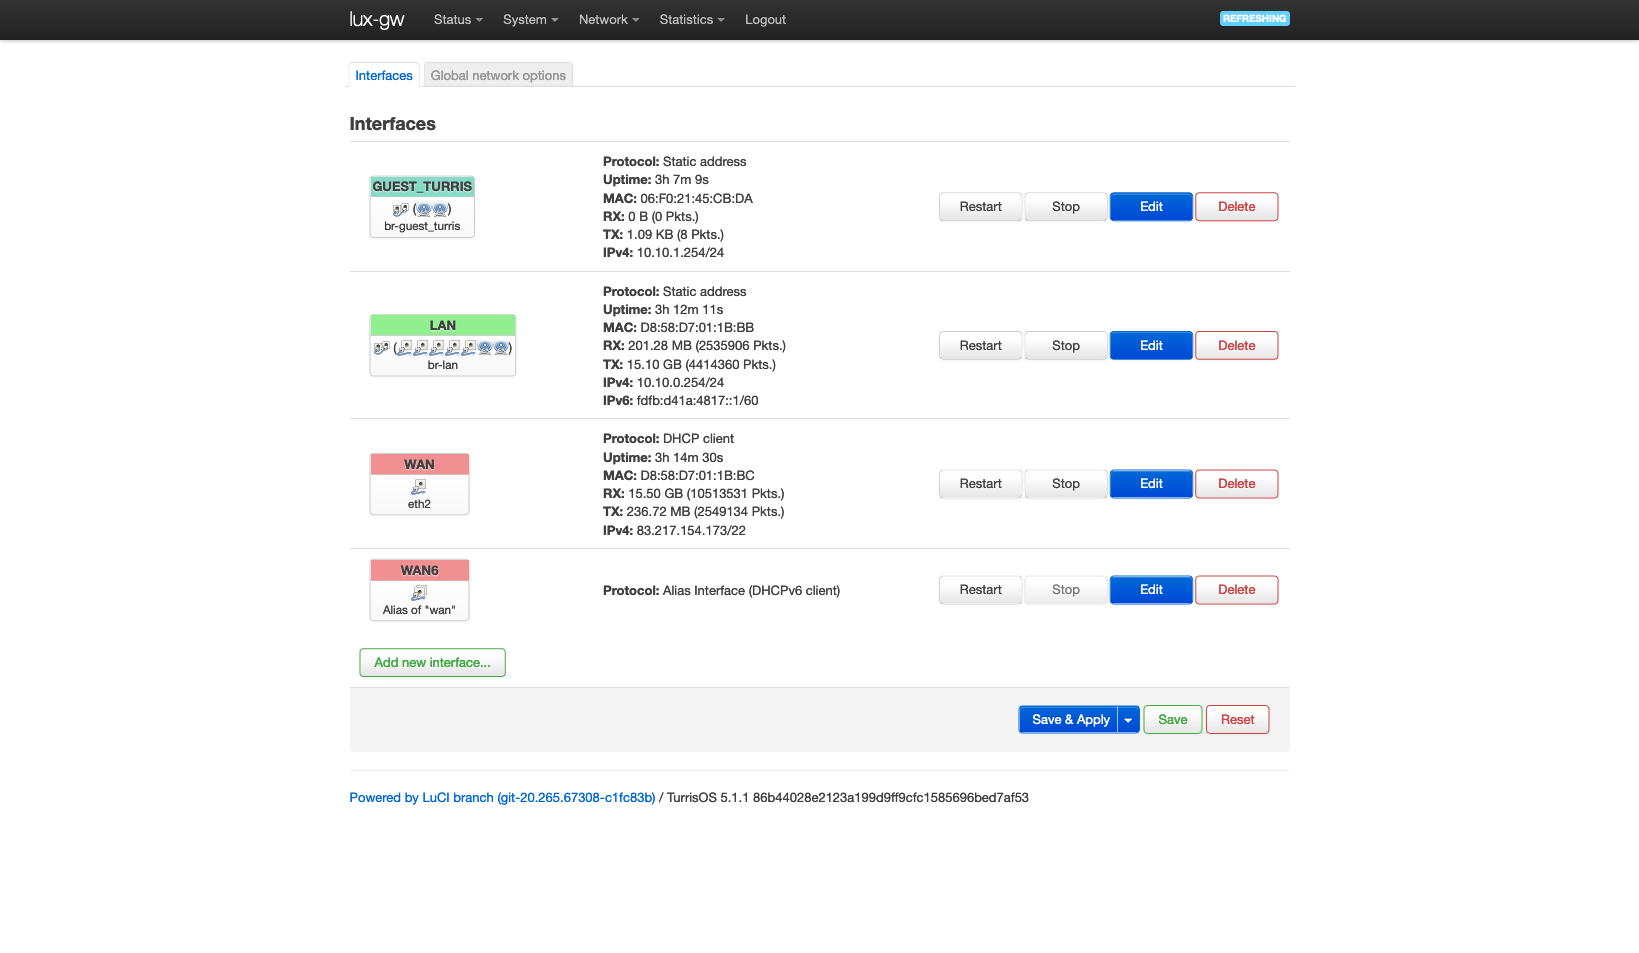
Under protocol select Unmanaged and under interface select Ethernet Adapter: examplenet and confirm.
Then go to Firewall Settings in the popup that opened and create a new zone called vpn.
Firewall settings
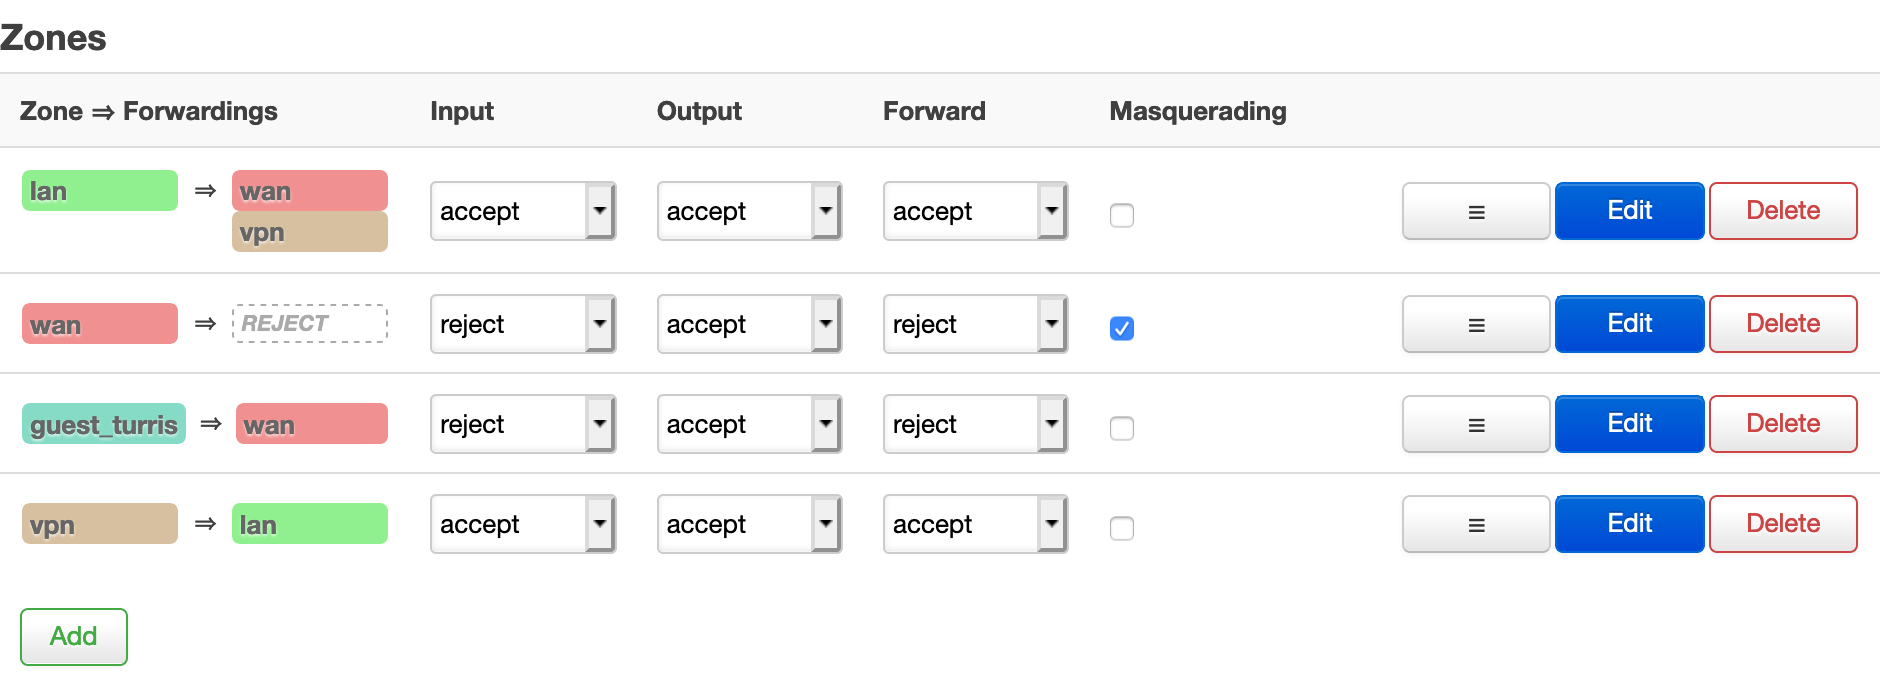
Now you'll be able to go to Network > Firewall > General Settings > Zones and allow routing to/from this network. My resulting Firewall Zone configuration is:
Next under Network > Firewall > General Settings > Traffic Rules you'll need to add a rule to route port 655 (both TCP and UDP) for tinc to the Turris router itself.
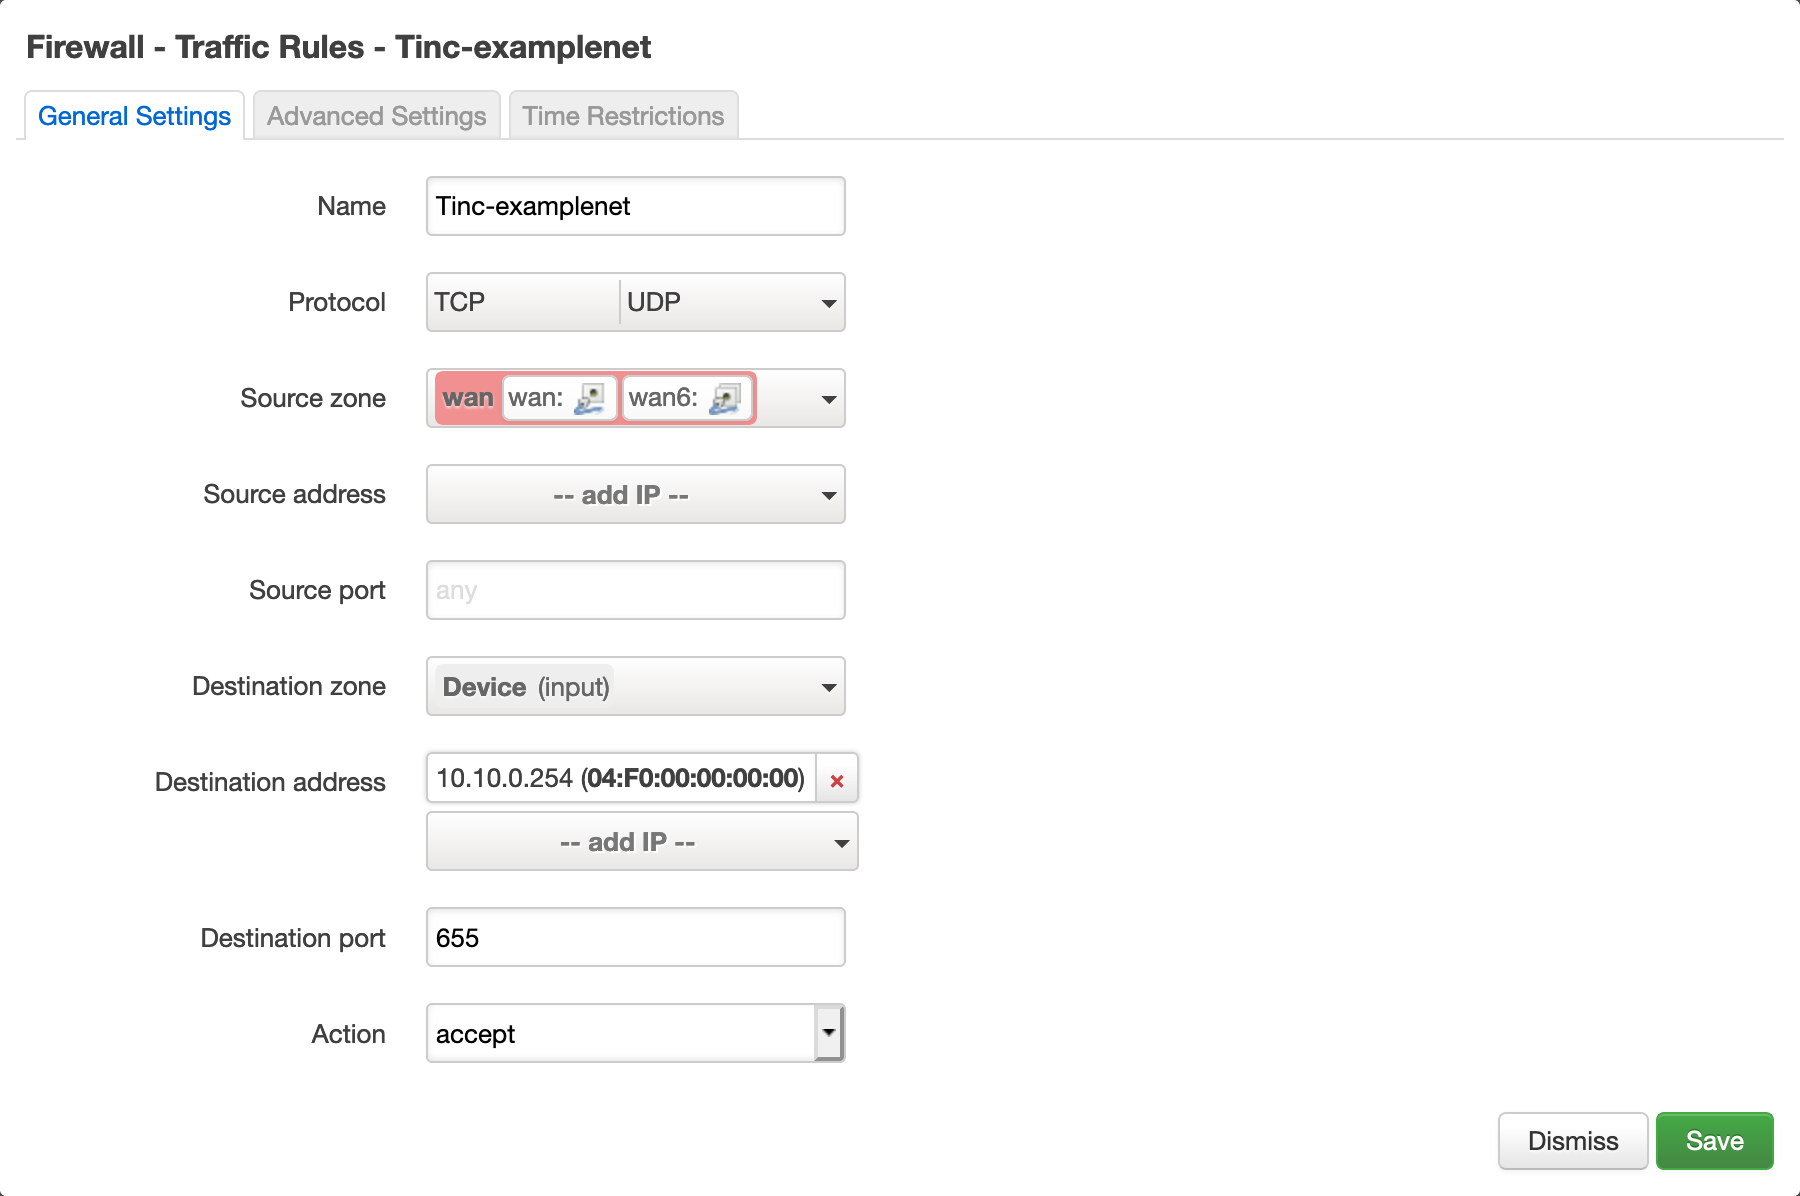
In my case, with my router having the IP 10.10.0.254, the configuration looks like the one above.
Wrapping it up
Now all that's left to do is to start Tinc. For this, in LuCI head over to System > Startup and Enable and Start tinc.
You should now be connected to your other nodes through tinc!
I would not have been able to get this up and running without the great write-up by everyone who contributed to the article here.